
Long story short, to make it work on ChatGPT, user need to ask the correct question after uploaded a photo.
To put into context, I am using ChatGPT free account that will require sign in, but I do not pay for it.
Continue reading
Long story short, to make it work on ChatGPT, user need to ask the correct question after uploaded a photo.
To put into context, I am using ChatGPT free account that will require sign in, but I do not pay for it.
Continue readingReferring to the original material at ESP32 with DHT11/DHT22 Temperature and Humidity Sensor using Arduino IDE | Random Nerd Tutorials
The reference is straight forward; however, it is not for the esp32-wrover.
Based on the from the reference, using educated guess without reading the specification, it is a hindsight that the original wiring will not work.
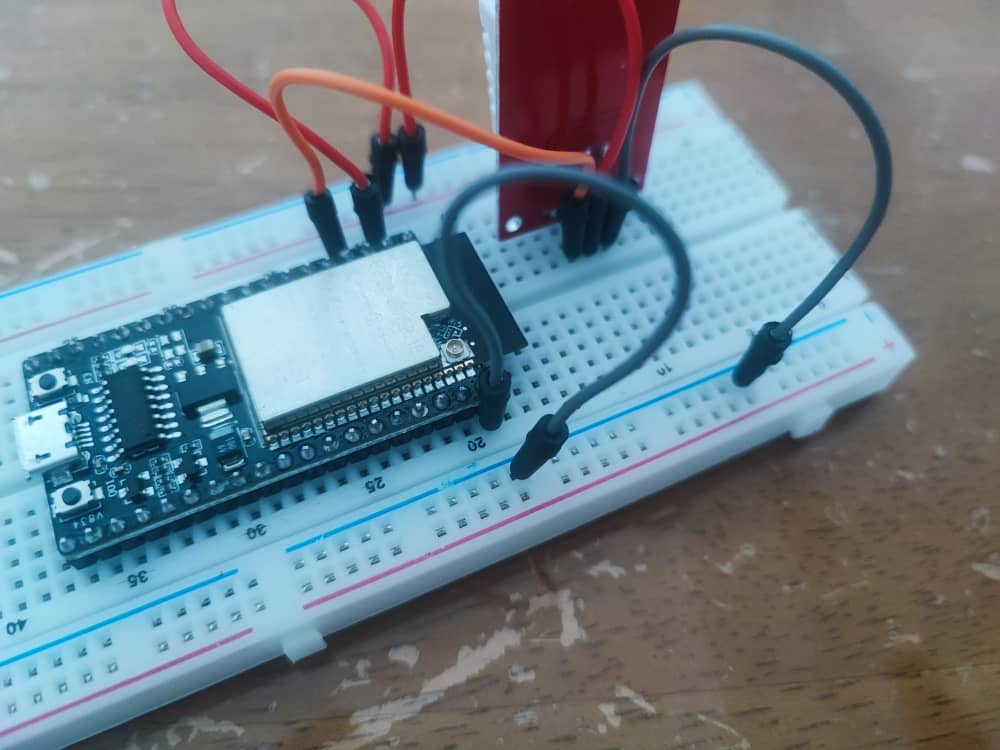
It didn’t work, was getting the error “Failed to read from DHT sensor!” from the sample code.
DHTPIN were used is 4, which I had wrongly assumed it to be the physical pin number. Little did I know that, the reference is referring to GPIO4 instead of the physical pin number.
Based on the reference, ESP32-wrover spec sheet page 9, the physical pin 4 is the SENSOR_VP.
Continue readingThis post is based mostly on Installing ESP32 Board in Arduino IDE 2 (Windows, Mac OS X, Linux) | Random Nerd Tutorials it is a good resource to get started on verify the ESP32-WROVER is working.
The hardest part is to determine what are the connector chip and installing libraries into Arduino IDE. Refer to the shared link in the beginning of this post.
Code from DeepSeek for a complicated hello world, assuming to make the LED blinks in morse code:
#include <Arduino.h>

#define LED_PIN 2  // Built-in LED on GPIO 2

// Morse code representations for A-Z
const char* morseCodes[] = {
  ".-",    // A
  "-...",  // B
  "-.-.",  // C
  "-..",   // D
  ".",     // E
  "..-.",  // F
  "--.",   // G
  "....",  // H
  "..",    // I
  ".---",  // J
  "-.-",   // K
  ".-..",  // L
  "--",    // M
  "-.",    // N
  "---",   // O
  ".--.",  // P
  "--.-",  // Q
  ".-.",   // R
  "...",   // S
  "-",     // T
  "..-",   // U
  "...-",  // V
  ".--",   // W
  "-..-",  // X
  "-.--",  // Y
  "--.."   // Z
};

void setup() {
  pinMode(LED_PIN, OUTPUT);  // Set the LED pin as an output
  Serial.begin(115200);
}

void loop() {
  String message = "SOS";  // Message to transmit in Morse code
  message.toUpperCase();   // Convert message to uppercase

  // Transmit the message in Morse code
  for (int i = 0; i < message.length(); i++) {
    char currentChar = message[i];
    if (currentChar >= 'A' && currentChar <= 'Z') {
      transmitMorse(morseCodes[currentChar - 'A']);  // Transmit Morse code for the character
    } else if (currentChar == ' ') {
      delay(1400);  // Gap between words (7 units)
    }
    delay(600);  // Gap between letters (3 units)
  }

  delay(2000);  // Wait before repeating the message
}

// Function to transmit a Morse code pattern
void transmitMorse(const char* morseCode) {
  for (int i = 0; i < strlen(morseCode); i++) {
    if (morseCode[i] == '.') {
      blinkDot();  // Transmit a dot
    } else if (morseCode[i] == '-') {
      blinkDash();  // Transmit a dash
    }
    delay(200);  // Gap between dots/dashes (1 unit)
  }
}

// Function to blink a dot (short flash)
void blinkDot() {
  digitalWrite(LED_PIN, HIGH);  // Turn the LED on
  delay(200);                   // Dot duration (1 unit)
  digitalWrite(LED_PIN, LOW);   // Turn the LED off
}

// Function to blink a dash (long flash)
void blinkDash() {
  digitalWrite(LED_PIN, HIGH);  // Turn the LED on
  delay(600);                   // Dash duration (3 units)
  digitalWrite(LED_PIN, LOW);   // Turn the LED off
}
Code to connect to WiFi:
#include <WiFi.h>
// Replace with your network credentials
const char* ssid = "myhome4iot";
const char* password = "i have the longest wifi password ever";
void setup() {
Serial.begin(115200);
// Connect to Wi-Fi
WiFi.begin(ssid, password);
Serial.println("Connecting to Wi-Fi...");
// Wait for connection
while (WiFi.status() != WL_CONNECTED) {
delay(1000);
Serial.print(".");
}
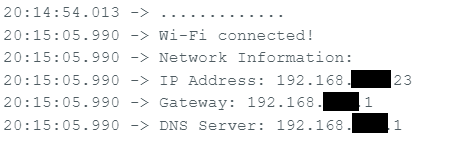
// Connection successful
Serial.println("\nWi-Fi connected!");
// Get and print network information
IPAddress ip = WiFi.localIP();
IPAddress gateway = WiFi.gatewayIP();
IPAddress dns = WiFi.dnsIP();
Serial.println("Network Information:");
Serial.print("IP Address: ");
Serial.println(ip);
Serial.print("Gateway: ");
Serial.println(gateway);
Serial.print("DNS Server: ");
Serial.println(dns);
}
void loop() {
// Nothing to do here
}
Code to scan WiFi:
#include <WiFi.h>
void setup() {
Serial.begin(115200);
// Set ESP32 to station mode
WiFi.mode(WIFI_STA);
WiFi.disconnect(); // Disconnect from any previous connection
delay(100);
Serial.println("Starting Wi-Fi scan...");
}
void loop() {
// Scan for nearby Wi-Fi networks
int numNetworks = WiFi.scanNetworks();
if (numNetworks == 0) {
Serial.println("No networks found.");
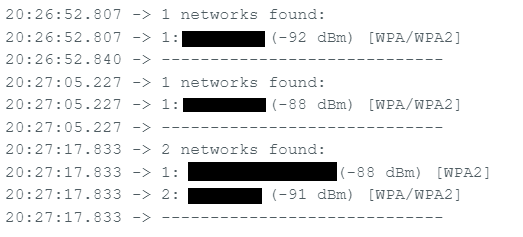
} else {
Serial.print(numNetworks);
Serial.println(" networks found:");
for (int i = 0; i < numNetworks; i++) {
// Print SSID and RSSI for each network
Serial.print(i + 1);
Serial.print(": ");
Serial.print(WiFi.SSID(i)); // SSID
Serial.print(" (");
Serial.print(WiFi.RSSI(i)); // Signal strength (RSSI)
Serial.print(" dBm)");
Serial.print(" [");
Serial.print(getEncryptionType(WiFi.encryptionType(i))); // Encryption type
Serial.println("]");
}
}
Serial.println("-----------------------------");
delay(10000); // Wait 10 seconds before scanning again
}
// Function to convert encryption type to a human-readable string
String getEncryptionType(wifi_auth_mode_t encryptionType) {
switch (encryptionType) {
case WIFI_AUTH_OPEN:
return "Open";
case WIFI_AUTH_WEP:
return "WEP";
case WIFI_AUTH_WPA_PSK:
return "WPA";
case WIFI_AUTH_WPA2_PSK:
return "WPA2";
case WIFI_AUTH_WPA_WPA2_PSK:
return "WPA/WPA2";
case WIFI_AUTH_WPA2_ENTERPRISE:
return "WPA2 Enterprise";
case WIFI_AUTH_WPA3_PSK:
return "WPA3";
case WIFI_AUTH_WPA2_WPA3_PSK:
return "WPA2/WPA3";
default:
return "Unknown";
}
}Unfortunately, due to the ESP32-WROVER hardware limitation, any modern 5GHz WiFi will not be able to be scanned or detected. On top of that, the stock ESP32-WROVER-IE needs to have a actual wifi cable to extend its range.
Type in nvcc –version from your Jetson Nano terminal is the sure way.
If the nvcc is missing, it could mean that the jetson-toolkit were not installed, or the binaries was not added to your session.

The commands to reassociate.
Continue readingAfter forcing the Jetson OS (based on the ubuntu 18.04) to have Python 3.8 running. After having the JetPack 4.6.3 installed in the Jetson Nano Jetson OS.
When attempting to install TensorFlow 2+ manually in the Jetson Nano based on Official TensorFlow for Jetson Nano! – Jetson & Embedded Systems / Jetson Nano – NVIDIA Developer Forums

Or running the pip3 install command:
sudo pip3 install --pre --extra-index-url https://developer.download.nvidia.com/compute/redist/jp/v46 tensorflowAfter a long time installing all the dependency for TensorFlow. A dreaded error message will occur.
ERROR: Failed to build installable wheels for some pyproject.toml based projects (h5py)

To understand the error, scroll up to read what are the error.
Continue readingPart number used for the board in the seeed reComputer J1020 connecting to the nVidia Jetson SODIMM module is reComputer J202 – Carrier Board for Jetson Xavier NX/Nano/TX2 NX.
Based on the spec sheet in the web site above, the J202 carrier board. Can be used to host the Jetson Xavier NX, Jetson Nano and Jetson TX2 NX.
Other than the Jetson Nano, any other Jetson module that is compatible with the J202 carrier board will requires a heatsink with active fan.
Recommended heatsink with active fan Manufacturer Part Number (MPN)s are as follows:
ATS-NVA-2781-C1-R0
114992687
Adding SSD into will requires M.2 nvme into the reComputer J1020, this post is based on Memory Expansion | Seeed Studio Wiki
The documentation is a bit vague on the NVMe SSD to be used other than very basic instructions. However, in my attempt it is smooth.
The SSD that was chosen as the expansion storage is the Kingston NV2 PCIe NVMe M.2 500GB. The J1020 requires the SSD to be M key.


For the folks that are impatient, the POC of DeepSeek is here KarMeng / deepseek-simple / localdev — Bitbucket
Continue readingThis post is based on reference to Use instance metadata to manage your EC2 instance – Amazon Elastic Compute Cloud
Metadata is a powerful tool for AWS users. It allows users to make query of data describing EC2 instances, and making a self reference API call.
By default any linux AMI will have curl build in, hence using of metadata will be simplified.
One of the best test case is automating input into shell script that will requires a lot of user prompt is automating or at least make configuration of setting up openvpn using AWS Lightsail easier.
!#/bin/bash
sudo chmod 777 ./openvpn-install.sh
sudo ./openvpn-install.sh << INPUT


y
1
1
11
n
n

client
1

INPUT
sudo cp /root/client.ovpn /home/ubuntu
sudo chmod 777 /home/ubuntu/client.ovpn
Above shell script will cause the openvpn-install.sh to fail in AWS, as the script does not provide public and local ip of the instance.
Below script are including the AWS Metadata
!#/bin/bash
TOKEN=`curl -X PUT "http://169.254.169.254/latest/api/token" -H "X-aws-ec2-metadata-token-ttl-seconds: 21600"`
PUBLICIP=`curl -X GET "http://169.254.169.254/latest/meta-data/public-ipv4" -H "X-aws-ec2-metadata-token: $TOKEN"`
LOCALIP=`curl -X GET "http://169.254.169.254/latest/meta-data/local-ipv4" -H "X-aws-ec2-metadata-token: $TOKEN"`
sudo chmod 777 ./openvpn-install.sh
sudo ./openvpn-install.sh << INPUT
$LOCALIP
$PUBLICIP
y
1
1
11
n
n

client
1

INPUT
sudo cp /root/client.ovpn /home/ubuntu
sudo chmod 777 /home/ubuntu/client.ovpn
By adding the metadata the ovpn file will be populated with correct IP.
AWS Metadata allow automation to be made simpler by running scripts that requires self-reference metadata to configure newly booted up EC2 instance(s).
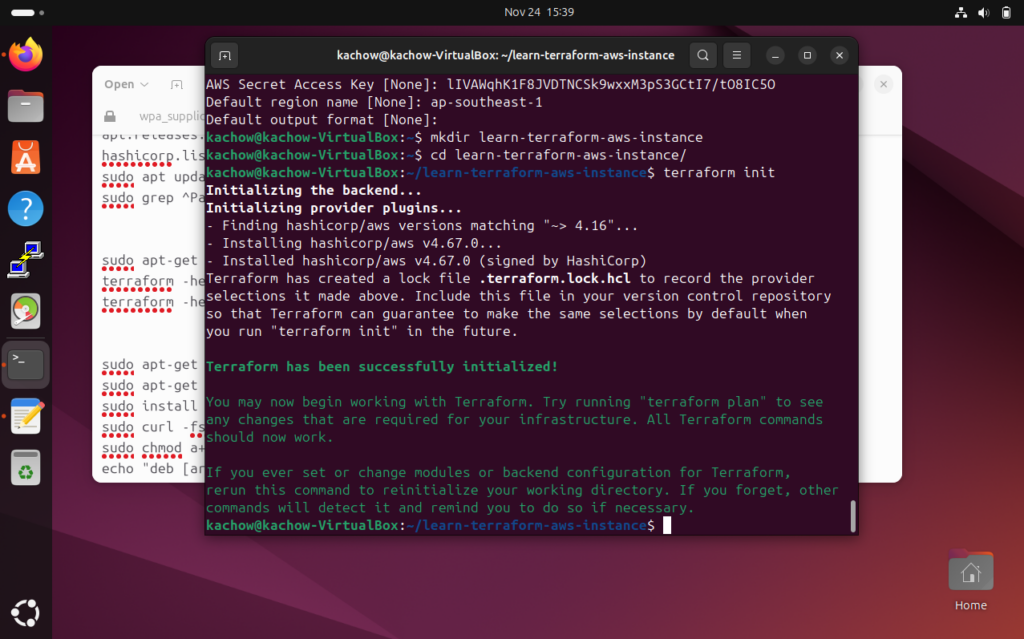
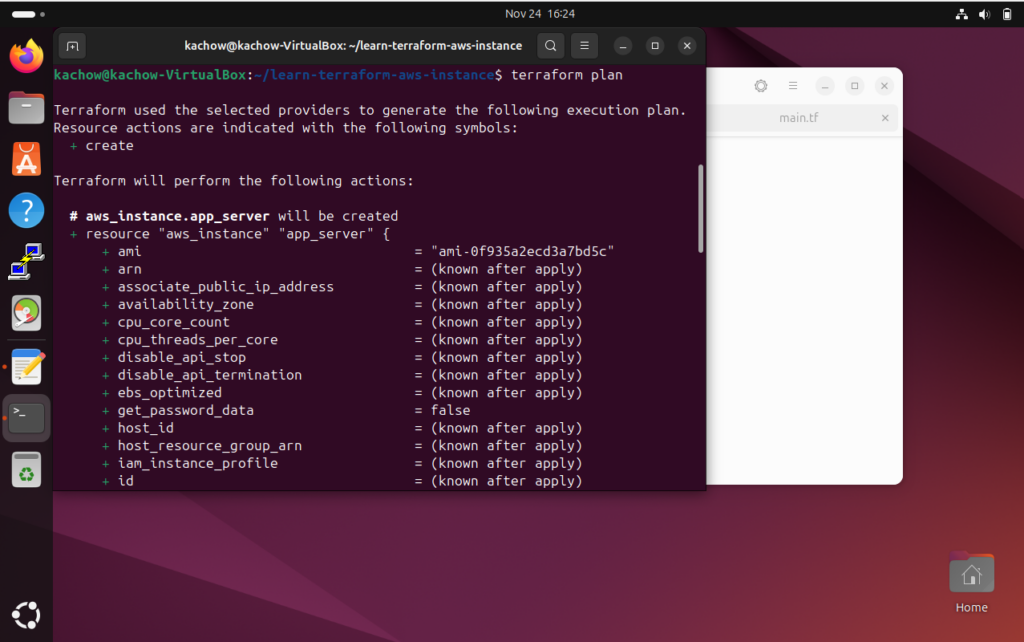
This post is based on terraform tutorial Build infrastructure | Terraform | HashiCorp Developer
Make sure AWSCli being installed and configured correctly (aws configure). Make sure IAM user are configured with AWS role, AWS Access key ID and AWS Secret Access Key.
Use the ami catalog, to determine the ami ID, then after make necessary changes run the init
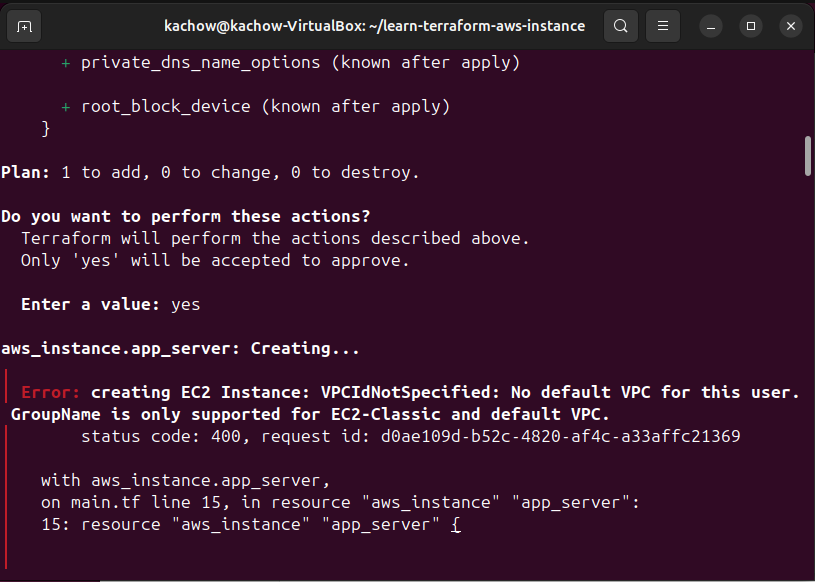
To solve this VPC and subnet needs to be created first.
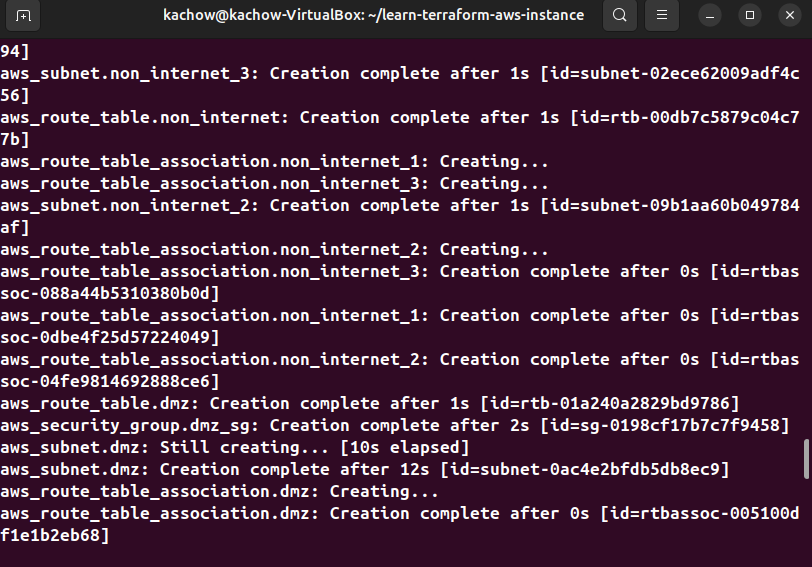
Make small change to the EC2 instance of terraform file.
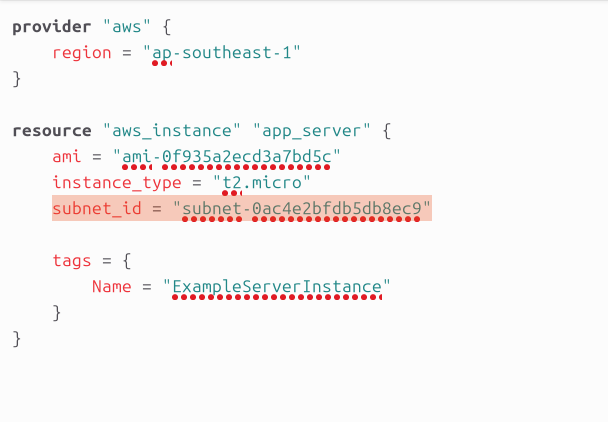
Rerun the terraform init, terraform plan, terraform validate before rerunning terraform apply, then type yes.
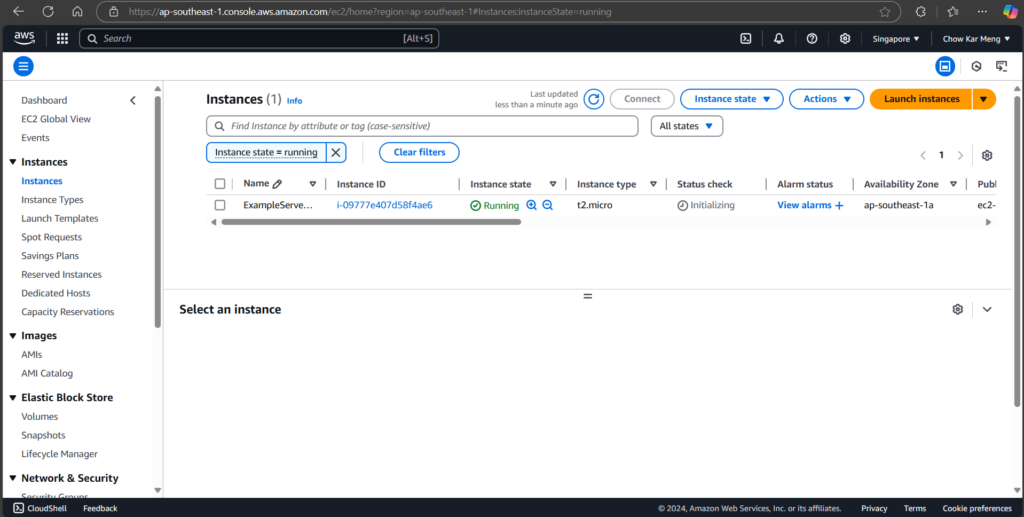
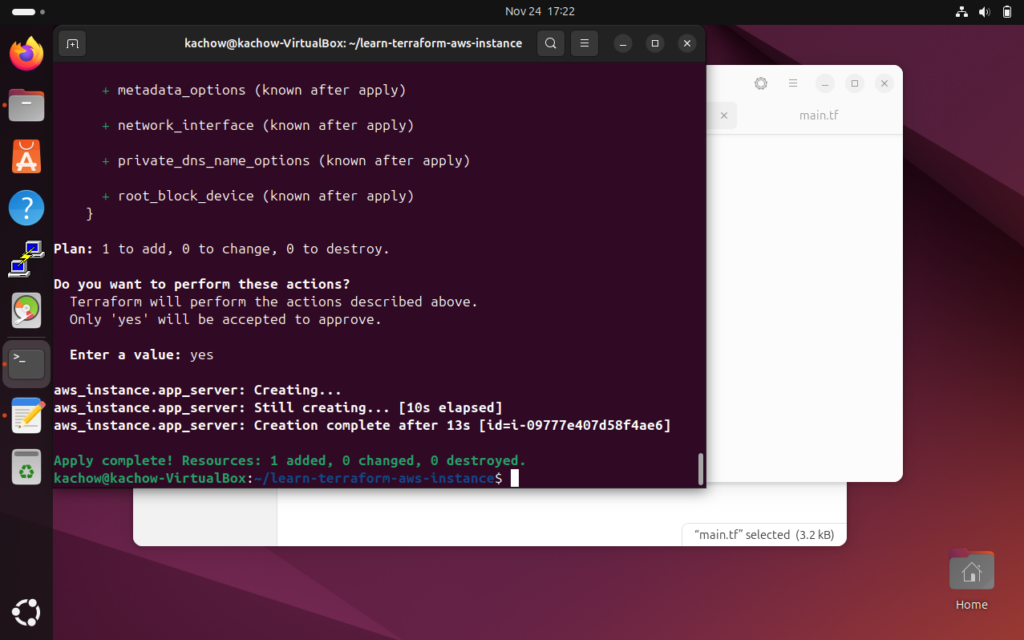
To clean up the experiment to avoid paying more, start by destroying the instance then the VPC.
Terraform code is available at https://bitbucket.org/KarMeng/terraform_aws